There’s nothing quite as disappointing as a perfectly cooked meal ruined by lumpy gravy. That silky, rich sauce is meant to unite flavors, not distract with unwelcome flour clumps. If you’ve ever wrestled with a balloon whisk, trying in vain to smooth out your gravy, you’re not alone. The secret to consistently smooth, lump-free gravy often lies in one specialized tool: the roux whisk. This guide will help you master the art of gravy-making, ensuring every pour is perfectly smooth, every time.

What is a Whisk and Why Do You Need One for Gravy?
A whisk is a fundamental kitchen tool designed to blend ingredients smoothly, incorporate air, or break up clumps. While various types exist, each with its unique purpose, the general principle remains the same: its wires create rapid movement and agitation within a mixture. For gravy, a whisk is indispensable for combining fat and flour into a roux, and then seamlessly incorporating liquid to create a thick, homogenous sauce without any unsightly lumps. It’s the continuous movement and the ability to reach all parts of the pan that prevent starch particles from clumping together and cooking unevenly.
Understanding Different Whisk Types for Gravy
Choosing the right whisk can significantly impact your cooking results, especially when making delicate sauces like gravy. While some whisks are multi-purpose, others are specialized for particular tasks.
The Classic Balloon Whisk: Pros and Cons for Gravy
Table is empty.The balloon whisk is perhaps the most recognizable type, with its wide, bulbous shape. It excels at incorporating air, making it perfect for whipping egg whites, cream, or light batters. Its broad profile allows it to move a large volume of liquid quickly, which can be useful for initial mixing. However, for gravy, its rounded shape can be a disadvantage. The wires often struggle to reach into the corners and along the flat bottom of a sauté pan or saucepan, leaving patches of flour or roux untouched, which can quickly turn into lumps. While it can work in a pinch, it’s not the optimal choice for precision sauce-making.
The French Whisk: A Closer Look
French whisks are a more elongated, narrower version of the balloon whisk, with denser wires. Their tapered design allows them to get into smaller pots and pans more effectively than a standard balloon whisk, making them better suited for stirring sauces and emulsifying dressings. The stiffer, closer-set wires offer more control and better contact with the bottom of the pan compared to a balloon whisk. While an improvement for sauces, it still may not provide the ultimate scraping power needed to prevent lumps from forming in a roux, particularly in shallow pans.
The Roux Whisk: Your Gravy Game-Changer
Also known as a flat whisk or sauce whisk, the roux whisk is specifically engineered for making gravies, pan sauces, and, of course, roux. Its distinctive flattened shape, resembling a two-dimensional balloon whisk, allows it to lie flush against the bottom of a shallow pan or roasting dish. This design is crucial for several reasons:
- Maximized Surface Contact: The flat wires ensure maximum contact with the cooking surface, effectively scraping up every bit of fat and flour. This prevents any flour from sticking to the bottom and burning, or forming dry clumps that lead to lumpy gravy.
- Reaching Pan Corners: Its flat profile and often angled handle allow you to effortlessly maneuver into the corners of square or rectangular roasting pans and saucepans, ensuring no flour is left behind.
- Efficient Blending: The design promotes constant movement of the roux, helping the flour particles fully hydrate and cook evenly with the fat, which is the foundation of a smooth gravy.
> “The flat whisk isn’t just a gimmick; its design directly addresses the challenges of making lump-free sauces, giving home cooks a professional edge.” – Chef Antoine Dubois, Culinary Instructor specializing in French Sauces.
Essential Factors When Choosing a Roux Whisk
Selecting the right roux whisk can make a significant difference in your culinary adventures. Consider these key factors to find the perfect tool for your kitchen.
Material (Stainless Steel vs. Silicone-Coated)
The material of your whisk is crucial for both performance and compatibility with your cookware.
- Stainless Steel: The most common choice, stainless steel whisks are durable, heat-resistant, and won’t rust or react with acidic foods. They provide excellent rigidity for breaking up clumps and scraping pans. However, they can scratch non-stick surfaces, so they are best used with stainless steel, cast iron, or enameled cast iron pots.
- Silicone-Coated: If you frequently use non-stick pans, a silicone-coated roux whisk is an excellent investment. The silicone protects the delicate non-stick surface from scratches while still providing effective whisking action. Ensure the silicone is high-quality and heat-resistant to prevent melting or degradation during cooking.
Size and Shape Considerations
Roux whisks typically come in various sizes, with lengths ranging from 10 to 14 inches. The ideal size depends on the depth and diameter of the pans you commonly use for gravy. A longer handle can keep your hand away from heat, while a shorter one might offer more control in smaller vessels. The flat shape is paramount; ensure it truly allows you to scrape the bottom and corners of your typical gravy-making pans. Some flat whisks have slightly more flexible wires, while others are very stiff, offering different levels of control and agitation.
Handle Comfort and Durability
A comfortable, non-slip handle is essential for continuous whisking. Look for handles made from ergonomic silicone, sturdy plastic, or well-finished wood that fits comfortably in your hand. The handle should be securely attached to the whisk head, minimizing wobbling or loosening over time. A well-constructed whisk will feel balanced and robust, ready to withstand vigorous stirring without bending or breaking.
Ease of Cleaning
Nobody wants a whisk that’s a nightmare to clean. While the multiple wires can sometimes trap food, a good roux whisk should be relatively easy to clean. Many stainless steel and silicone whisks are dishwasher-safe. If hand-washing, look for designs where the wires are well-spaced enough to allow food particles to be easily rinsed or brushed away. Avoid whisks with intricate designs or tight crevices where food can get permanently stuck.
Step-by-Step Guide: Using a Roux Whisk for Perfect Gravy
Making lump-free gravy is a process that benefits greatly from precision and the right tools. Here’s how to harness the power of your roux whisk.
Preparing Your Roux
The roux is the foundation of most gravies, and getting it right is the first step to smoothness.
- Fat-to-Flour Ratio: Start with equal parts fat (butter, oil, or pan drippings) and flour by weight or volume. For instance, two tablespoons of fat to two tablespoons of flour.
- Melt and Sprinkle: Melt your fat in a wide, shallow pan over medium heat. Once shimmering, gradually sprinkle in the flour while continuously whisking with your roux whisk.
- Cook the Roux: Keep whisking constantly, ensuring the flat head scrapes the entire bottom surface of the pan. Cook the roux for 1-3 minutes for a light, blonde roux (best for creamy gravies) or longer for a darker, nuttier brown roux (ideal for richer, deeper-flavored gravies). This cooking process eliminates the raw flour taste and allows the starch to fully coat the fat, preventing lumps.
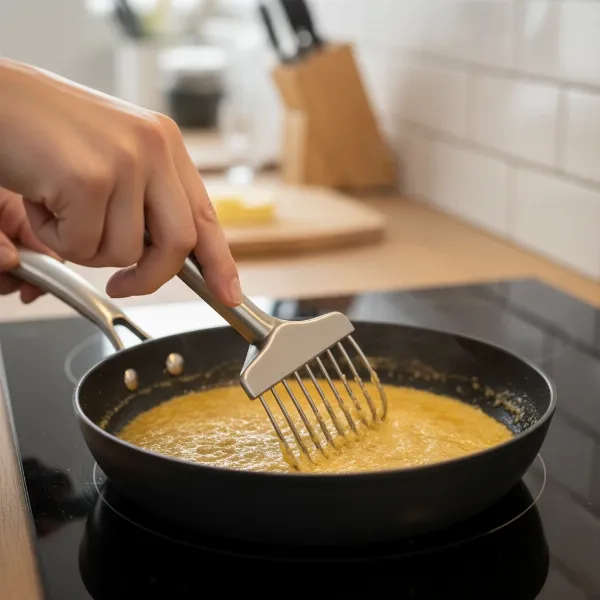 A person using a flat roux whisk to prepare a roux in a shallow pan, stirring butter and flour together.
Gradual Liquid Addition and Continuous Whisking Technique
This is where the magic happens and where the roux whisk truly shines.
- Warm Liquid is Key: Ensure your liquid (broth, stock, or milk) is warm, not cold. Adding cold liquid to a hot roux can shock the mixture and promote clumping.
- Slow and Steady: Begin adding the warm liquid in a very slow, steady stream, or in small increments (about 1/4 cup at a time).
- Vigorous Whisking: While adding the liquid, whisk vigorously and continuously with your roux whisk. Your goal is to thoroughly combine the liquid with the roux, breaking up any potential flour pockets immediately. The flat shape of the whisk will effectively agitate the entire bottom surface, ensuring no dry flour is left to form lumps.
- Achieving Smoothness: Continue adding liquid gradually and whisking until all the liquid is incorporated and the gravy is smooth and lump-free. It will start thick and gradually loosen.
Reaching Every Corner: The Roux Whisk Advantage
The unique design of the roux whisk allows you to reach into every crevice and along the entire flat bottom of your pan. Unlike a balloon whisk that might glide over the edges, the flat head scrapes and agitates flour particles that tend to settle or stick. This constant, thorough agitation is critical for preventing those stubborn lumps from forming in the first place, ensuring uniform thickness and texture throughout your gravy.
Maintaining Heat and Consistency
After incorporating the liquid, continue to whisk occasionally as the gravy comes to a simmer. The heat will activate the starch in the flour, causing the gravy to thicken.
- Simmer, Don’t Boil: Bring the gravy to a gentle simmer, not a rolling boil. Simmering allows the starch to swell and thicken evenly.
- Adjust Consistency: If the gravy is too thick, gradually whisk in more warm liquid until it reaches your desired consistency. If it’s too thin, you can let it simmer a bit longer, whisking frequently, to reduce and thicken, or create a small slurry (cornstarch/flour mixed with cold water) and whisk it in a little at a time.
- Season and Serve: Once the desired consistency is achieved, season your gravy with salt, pepper, and any other desired herbs or spices. Serve immediately for the best results.
Top Roux Whisk Recommendations for Smooth Gravy
Finding the ideal roux whisk can elevate your gravy-making. Here are some top choices that excel in creating smooth, lump-free sauces.
| Whisk | Pros | Cons | Price Range (Approx.) |
|---|---|---|---|
| OXO Good Grips Flat Wire Whisk | Excellent flat shape, comfortable non-slip grip, durable stainless steel | Might scratch non-stick pans | $10 – $15 |
| Rösle Stainless Steel & Silicone Flat Whisk | Silicone edges protect non-stick, sturdy, high-quality German engineering | Higher price point, heavier | $25 – $35 |
| Norpro Krona Stainless Steel Flat Whisk | Good value, stiff wires for effective scraping, durable | Handle can heat up, less ergonomic than OXO | $8 – $12 |
Mastering Your Roux Whisk: Tips and Troubleshooting
Even with the right tool, a few tips can ensure your gravy is always a culinary success.
Best Practices for Prevention
- Equal Fat and Flour: Always start with a 1:1 ratio of fat to flour for your roux. This balance is crucial for a smooth base.
- Cook the Roux Thoroughly: Don’t rush the roux-cooking step. Allowing the flour to cook out and toast with the fat is essential for flavor and lump prevention.
- Warm Liquid: As mentioned, always add warm or hot liquid to your roux.
- Constant Whisking: Keep that roux whisk moving, especially when adding liquid. Agitation is your best friend against lumps.
- Scrape the Edges: Utilize the flat shape of your whisk to scrape the bottom and corners of the pan constantly.
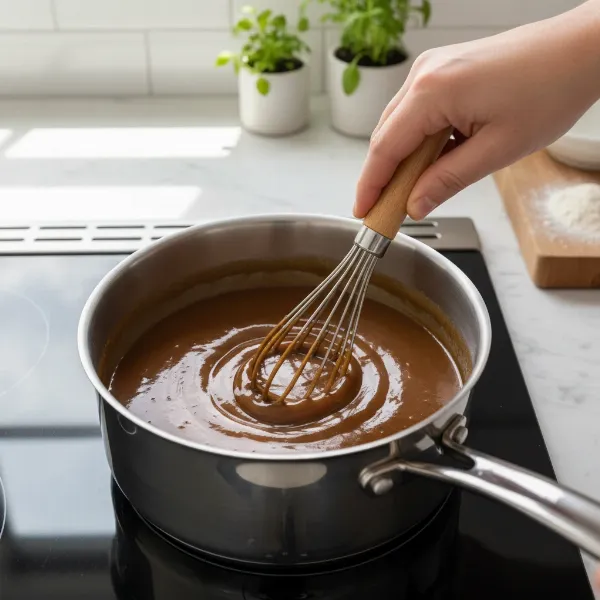 A person demonstrating proper whisking technique with a roux whisk in a saucepan of gravy, showing fluid motion.
Common Mistakes and How to Avoid Them
- Adding Cold Liquid: This is a primary culprit for lumps. Avoid it by gently warming your broth or stock before adding it.
- Dumping in Liquid Too Fast: Introducing too much liquid at once overwhelms the roux, making it hard to incorporate smoothly. Add it gradually.
- Not Whisking Continuously: Pausing during liquid addition allows flour to clump. Keep whisking until smooth.
- Under-cooking the Roux: A raw-tasting flour flavor or an inability to thicken properly can result from an undercooked roux. Ensure it cooks for at least 1-2 minutes.
- Using the Wrong Whisk: A balloon whisk, while versatile, isn’t optimized for the flat bottom of a sauce pan, making lump prevention harder.
What if Lumps Still Appear?
Even with the best technique, sometimes lumps happen. Don’t panic!
- Vigorous Whisking: Your first line of defense. Keep whisking energetically with your roux whisk, getting into every corner. Often, minor lumps can be broken down this way.
- Fine-Mesh Sieve: If lumps persist, pour your gravy through a fine-mesh sieve into another bowl. Press any solids through with a rubber spatula or the back of a spoon, then reheat the strained gravy.
- Immersion Blender: For a quick and effortless fix, an immersion blender can smooth out lumpy gravy directly in the pot. Just be careful not to over-process and create a foamy texture.
Conclusion
Creating perfectly smooth, lump-free gravy is a culinary triumph that’s well within your reach. By understanding the science behind roux and leveraging the specialized design of a roux whisk, you can confidently transform pan drippings and stock into a rich, velvety sauce. This indispensable tool, with its ability to tirelessly scrape every inch of your pan, ensures a consistently superior texture that will impress every guest at your table. So, are you ready to whisk your way to gravy perfection?
Frequently Asked Questions
What is the primary benefit of a roux whisk compared to a balloon whisk for gravy?
The primary benefit of a roux whisk is its flat design, which allows it to make full contact with the bottom of a shallow pan. This maximizes scraping action, ensuring all flour and fat are thoroughly combined and no clumps form, which a rounded balloon whisk cannot achieve as effectively.
Can I use a silicone-coated roux whisk with all types of cookware?
Yes, a silicone-coated roux whisk is safe for all types of cookware, including delicate non-stick surfaces, stainless steel, and cast iron. Its soft coating prevents scratches while still providing efficient mixing and scraping.
How do I know if my roux is cooked enough before adding liquid?
Your roux is cooked enough when it reaches the desired color (blonde, peanut butter, or dark brown) and has a pleasant, slightly nutty aroma, no longer smelling of raw flour. This typically takes 1-5 minutes, depending on the desired color and heat level.